Category: Recipes

LaSalette Restaurant – A Taste of Portugal in Sonoma, California


LaSalette Restaurant/By Guest Editor, Dan Dias

I had always heard that California’s climate, the rich abundance of fresh seafood and locally grown produce made it similar to Portugal.

Perhaps that’s why the wave of Portuguese immigrant fisherman, whalers, and farmers who arrived there, soon made it their home for many generations to come.

Today, California has a large and thriving Portuguese community that embraces their culture and heritage.

On our second trip to California, my wife and I visited Napa Valley, toured the vineyards that truly reminded us Portugal and visited many other sights.

We ended our last night in Sonoma, California, with a wonderful cultural dinning experience at LaSalette Restaurant.

Owner/Chef Manuel Azevedo offers his own interpretation of modern Portuguese cuisine, which celebrates the immense flavors and dishes of Portugal while encouraging the use of fresh local, seasonal ingredients.

LasSalette’s old world ambiance, with it’s open hearth kitchen, generates home style comfort and appeal.The gracious Portuguese hospitality provided by the attentive staff as well as the familiar “Gallo de Borcellos” the LaSalette mascot, a national symbol of Portugal adorning the staff uniforms said to us; “Welcome to Portugal” as soon as we walked in the door!

The taste tempting menu with it’s quintessential Portuguese flavors, the home made breads, and tempting aromas in the air, left our pallets craving and anticipating our planned Summer trip to Portugal in August!

Our first bite of the amuse bouche (first bite) of Chourica with melted Sao Jorge Cheese with olives temped us with it’s spicy yet creamy taste. The appetizer of Scallops, chourico crusted Japanese sweet potato puree, with leek confit and Portuguese molho was superb.

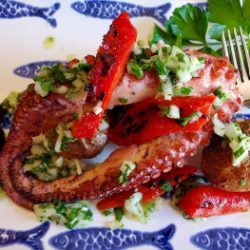
We dived into the appetizer combination platter of succulent baby octopus, sweet tripe stew, fried goat cheese with compote jam, homemade bread and almonds all complemented by our Portuguese Douro valley wine selection; Vale de Bomfim.


Amuse Bushe – Chourica & Sao Jorge Cheese – LaSalette Cook Book

For my entree, I ordered the classic “Fisherman’s Stew” made fresh California coastal seafood of;  juicy clams, mussels, shrimp and fish prepared in a rich broth with Portuguese chourica and spices.

My wife’s Wood Fired Branzino was simply the best she’s ever had!

Wood Fired Branzino

Whole Wood Fired Branzino – LaSalette Cook Book

Caldeirada – Portuguese Fisherman’s Stew – Sea bass, scallops,

clams, mussels, shrimp, fingerling potatoes, linguiça, lobster fumet

Vale de Bomfim

Chocolate Fetish – Chocolate mousse with almond tuile, chocolate soufflé

with ruby port geléeand bitter chocolate sorbet with caramelized banana

We smiled at each other as we overheard the couple at the next table who had never tasted tripe or Portuguese cuisine before, rave on and on about it’s goodness! We knew they would become adoring fans of Portuguese food just like many others before them.

The Chocolate Fetish dessert created a perfectly sweet ending to our diner that lasted during the taxi drive back to our hotel. We had a great experience dining at LaSalette and we plan on re-creating it again next year!

You don’t have to fly to California to taste the amazing dishes that Chef Azevedo has created for his guests, just visit the LaSalette website and order the LaSalette’s cook book because most of the dishes served at the restaurant are in it!

This book is not an ordinary cook book. It is meant to be used, shared and then passed down in the family. It contains 360 pages, over 270 recipes, and the beautiful photographs by Portuguese photographer Henrigue Bagulho will leave you craving the flavor of Portugal, and inspire you to try the recipes.

What a perfect gift for the special Portuguese foodie in your life!

*Order now for FREE SHIPPING ON COOK BOOK ONLY-  for the month of MAY with SPECIAL CODE: “PICK UP”

*Free Shipping on cook book only – available in Continental USA-May only

*If purchasing book with other products you must order items separately to receive FREE SHIPPING on The Cook Book*

Here’s the video from the cook book!


“My personal mission is to do whatever I can to put Portuguese cuisine in its rightful place alongside other great cuisines in the United States. Because the truth is, if we want to survive and prosper as a culture, we need to make an impact, not merely be present.” Chef Azevedo/Owner – LaSalette

Chef Manuel Azevedo

Grilled Sardines, Pickled Sea Beans and Azorean Green Sauce – LaSalette Cook Book


Olive Oil Poached Salt Cod Fish

Alentejana Style Pork & Clams – LaSalette Cook Book


Chef Azevedo has recently opened a new restaurant in Healdsburg, CA, called Cafe Lucia!

Lasalette

lasalette-restaurant.com

18625 Sonoma Highway 12
Sonoma Ca 95476
707-938-192

Cafe Lucia

Inventive, contemporary Portuguese Cuisine
in the heart of the Sonoma County Wine Country

www.CafeLucia.net

235 Healdsburg Avenue, Suite 105
Healdsburg, CA 95448

Tel (707) 431-1113


Mini Pão-de-ló

Mini Pao de Lo photo and recipe by: www.alquimiadostachos.com

I found this recipe for Mini Pão-de-ló last week. They look so cute and delicious!

I though this would be a great treat for you to make for Mom on Mother’s day.

Watch the classic song;  “Mãe Querida” at the end of this post!

Happy Mother’s Day to all the moms! Enjoy!

  • Ingredients:
  • 2 Eggs
  • 10 Egg yolks
  • 12 tbsp of sugar
  • 5 tbsp flour
  • 1 tsp of baking powder


  • Instructions:

Beat the eggs, yolks and sugar for 10 minutes until very light and foamy.

Sift together the flour and baking powder and fold into the batter gently.

Form molds with parchment paper inside coffee mugs into 18 liners and place in muffin trays (you may use cup cake liners instead)

You may find that the amount may vary depending on the size of your muffin tins.

Preheat oven to 428 degrees. Pour batter into molds and cook for 5 minutes.


Portuguese Translation: 

Ingredientes:


  • 2 ovos
  • 10 gemas de ovo
  • 12 colheres (sopa) de açúcar
  • 5 colheres (sopa) de farinha
  • 1 colher de chá de fermento em pó


Preparação:


Bater as gemas, os ovos e o açúcar até obter um creme muito leve e espumoso (cerca de 10 minutos).

Juntar a farinha com o fermento e peneirar. Envolver delicadamente no creme de ovos.

Com a ajuda de um copo, formar 18 formas de papel almaço.

Verter nelas a massa e levar ao forno pré-aquecido a 220ºC, durante 5 minutos.

Obs.: Coloquei as formas de papel num tabuleiro de queques, para evitar que estas se abrissem durante a cozedura.


Vários Artistas – “Mãe Querida”

Bolos de Arroz – Rice Flour Cupcakes

My first memory of eating Bolos de Arroz (Rice Flour Cupcakes) was when my family traveled back to Portugal a long time ago.
The morning after arriving in Lisbon, my parents took my brothers and sisters and I downstairs to the bakery located in my Aunt’s apartment building.
When we placed that first step onto the sidewalk the aroma of the fresh Papo Secos baked that morning made my mouth water.
Little did I know that something better was going to get me hooked for the rest of my life!
Nothing tempts your pallet more than a Portuguese bakery early in the morning when you can smell the fresh bread, the pastries and the fresh brewed espresso being served.
This was my first attempt at making this recipe and I was pleasantly surprised at how wonderfully light and fluffy they came out. My first bite brought me back to Portugal and that bakery. Enjoy the recipe and I hope it brings you back some found memories!
Ingredients for 12 cakes in muffin tins or (6 coffee cups 6 to 8 oz)
1 1/2 cups of sugar
2 cups flour
1 cup rice flour
3/4 cup of margarine
2 tablespoons of baking powder
6 eggs room temperature
1 cup of warm milk
2 tsp of grated lemon peel

Instructions:
* Note: Prepping the parchment paper took the longest time. Do this step first:
I also used ceramic coffee cups to bake the cakes because I wanted to make it authentic looking but this is optional. You can make also these with regular muffin tins using cupcake liners.
Line muffin tins or oven proof cups or ramekins with parchment paper or use cup cake liners and lightly spray with cooking spray.
Begin Prep:
Beat together the sugar and margarine until light and fluffy. Add the lemon zest and beat well.
In a separate bowl, beat the eggs and milk until well incorporated, then add to the sugar mix. Beat the batter for at least 5 minutes.
Add both flours and baking powder to the batter and  beat for at least 5 minutes or until the batter is light yellow, and fluffy.
Fill the tins, or cups 3/4 to top. Cook at 350 for 20-25 minutes. (If you use ceramic cups it will take 30 minutes or longer depending on your oven).
During the last 5 minutes sprinkle with granulated sugar and cook until they turn a golden brown. Enjoy!
You can also make mini cupcakes but cook for only 15 minutes or less depending on your oven.


Bifana Flat Bread Pizza

Bifana Flat Bread

Ingredients:

1 lb Pizza Dough

2 cups cooked pork loin (Bifanas) cut into thin strips

1 large sliced onion

1 small sliced green or red pepper

1 cup thinly sliced cooked potatoes

1 tsp paprika

1/2 tsp salt

1/2 tsp pepper

3 tbsp Olive Oil

2 crushed garlic cloves

1 cup shredded cheese (any you prefer)

*Piri Piri or Tabasco sauce if desired


In a large saute pan on high, grill onions and peppers in olive oil until translucent.

Lower heat to low. In a large bowl mix together the salt, pepper, paprika, garlic, pork and potatoes. Shake the bowl to mix ingredients.

Add the pork and potatoes to the pan with onions, stir well to incorporate flavors and set aside.

Sprinkle corn meal on a sheet pan or pizza stone. Roll out Pizza dough to desired shape and place on pan.

Brush the dough with the olive oil in pan from the onion sauce.

Spread the onion and pork topping evenly over the pizza. Add a few drops of *Piri Piri Sauce if you like it hot!

Top with shredded cheese as desired.

Cook at 400 for about 15-20 minutes or until the cheese is melted and a golden crust forms.

Enjoy!


Portuguese Style Chick Pea and Egg Salad

Chick Pea and Egg Salad


This dish can served as a side dish or main dish. It’s very popular as a side dish with Bacalhau Cozido (Boiled Salt Cod recipes) or Bacalhau Assado (Baked Cod Fish)

Ingredients:

2 cans Chick Peas (I use Progresso)

6  hard boiled eggs (sliced)

1/2  tsp salt

1/2 tsp pepper

1/2 small chopped onion

2 tbsp chopped fresh parsley

1/4 cup Olive Oil

1/4 cup White Vinegar

Instructions:

Rinse the chick peas, drain and put into a medium bowl. Toss in all ingredients.

Let  the mix sit for at least 15 minutes to absorb the marinate.

Taste and add more seasonings if desired.

Serve or store in refrigerator until the next day.

Pineapple Glazed Ham

This recipe for Pineapple Glaced Ham is easy. Don’t buy those expensive fancy hams because this ham recipe is just as delicious, and juicy.

All you need is a regular shank ham or a butt portion ham that you’ll find on sale in your supermarket. Some hams come spiral cut for you.

You’ll only need one can of Pineapple slices and 1/2 cup of brown sugar.  In the photo, I added 1 cup of dried cranberries for my Christmas Ham but this is optional.

Make my Portuguese Style Sweet Potatoes as a side dish. 


Instructions:

Wash the ham, cut off any excess fat and place it in a baking pan that has been lined with foil for easy clean up. Add 2 cups of water to the pan.

The water will help draw out the salt from ham while keeping it moist while baking!

Heat oven to 325. Loosely cover the ham with aluminum foil and place it in the oven. Let the ham cook for 20 minutes per pound or more depending on the size of your ham.

*Note: If you have spiral ham cook as per package directions since it will take less time to cook.

Strain the pineapples into a small bowl but save the juice. In a small pan heat the sugar and the pineapple juice at medium heat until the sugar has dissolved and slightly thickened.

During the last 30 minutes before the ham is cooked, remove the pan from the oven and  drain the water out of the pan. Pour 1/2 of the glaze over the ham.

Top with the pineapple slices. Pour the glaze over the ham and pineapple slices. Cook for the remaining 30 minutes.

Place the ham on a large serving platter and pour any leftover glaze over it. Arrange dried fruits and fresh fruit around the serving platter for a festive presentation that will wow your guests!

This ham can be served hot or cold and perfect for your holiday parties.

Enjoy and Happy Holidays!


Batatas a Murro – Portuguese Garlicky “Punched Potatoes”

Order this beautiful Customizable Galo de Barcelos Ebroidered apron on Lisbon Blue Shop


If you love garlic, you’ll love this recipe for “Punched Potatoes”. Cook them in the oven along with your roasts and save yourself time in that kitchen!

You can use any kind of potato but I like to use russets or Idaho potatoes since they’re tend to bake fluffier. If you don’t like garlic just leave it out and use only the warm olive oil salt and pepper.

It doesn’t get any easier that! Enjoy!

Here’s A Potato Story from my younger days.

Before coming to America, my parents grew potatoes on their small farm in Northern Portugal near the border with Spain which provided enough income to support our family all year. My mother loved selling those potatoes and she loved being a business woman. Each harvest season my father traveled around the surrounding communities selling the potatoes to the local residents right off his truck.

The first year after immigrating to America, they learned about the fall harvest tradition observed by many Portuguese Americans living in New England who visit local potato farms to buy the newly harvested potatoes called “Green Mountains” in 50 pound sacks. The potatoes are then stored in the root cellars or in garages for consumption during the long winter months.

I hated potatoes when I was a little girl and honestly, I’m still not a big fan. Perhaps this is why I remember this event vividly.

One Saturday in late September my parents visited one of those local potato farms and brought home a huge truckload of fifty, 50 pound sacks of potatoes for our family to eat during the winter. If you do the math, that equals two and one half tons of potatoes!

I cringed at the thought of eating those damn potatoes all winter as I stood there watching my father and two brothers exhaustively unload the truck and carry the sacks into the basement!

Five months later, February arrived and the basement was filled with sacks of wrinkled potatoes that had sprouted and no longer edible! My poor brothers cursed as they lifted the 40 sacks of potatoes back up the cellar steps and load them back into that same truck to had brought them to bring to the dump! 

I often think that my mother missed being a potato farmer and a business woman, and she had secretly planned on selling those potatoes around town just like she had back in Portugal.

Her potato buying was scrutinized and limited from that year on, but this story has become a laughable family tale told every year during potato season in New England.

Learn more fascinating Potato history in Portugal at: (http://www.virgiliogomes.com/chronicles/135-glory-of-the-potato


Ingredients:

2 pounds small russet or Idaho potatoes

1 teaspoon sea or regular salt

1 teaspoon pepper

2 or 3 large cloves garlic (finely chopped)

1/2 cup of olive oil

Preparation:

Wash and scrub the potatoes. Remove any blemishes and pat dry. Pierce with a fork in a couple of spots. Coat with sea salt and a drizzle of olive oil.  Gently rub the oil into the potatoes and place in small oven proof dish or pan. I use an oven to table dish for easy serving. Cook at 400 degrees  for 45 minutes to 1 hour depending on your oven.

Note: (You can also boil the potatoes in salted water, with the skin on for about 30-45 minutes. Pierce with a fork for doneness.)

Meanwhile, make garlic oil:

In a small saucepan heat the oil and add the garlic. Cook on low for a few minutes untill the garlic turn slightly golden. Do not overcook or the garlic will become bitter!

To test potatoes for doneness, pierce them with a fork or gently squeeze a potato holding your oven mitt. The potato should be soft.

When the potatoes are ready, punch them down with your fist wrapped in a clean dish towel. or with a meat mallet until they “POP” open.

*Note: The potatoes are hot – be careful!


 When ready to serve, pour the garlic olive oil over the potatoes and sprinkle on fresh cracked black pepper as desired.

Place in the oven on low until ready to serve or re-heat the next day! Enjoy!


Sopa de Feijao – White Bean Soup

Portuguese White Bean Soup with Pasta

Ingredients:

8 cups water

2 cups vegetable, chicken, or beef broth

1 large chopped onion

1 large chopped carrot

1 large potato cut into cubes

2 cloves garlic

1 bay leaf

1 tbsp salt

1 tsp black pepper

1/4 cup olive oil

4 to 6 oz of Elbow Macaroni

1 can Progresso white beans

1 cup finely chopped Savoy Cabbage

Instructions:

Place all ingredients except the macaroni, beans and cabbage in a large stock pot. Cook on med-high for 20 minutes. Remove from heat, remove bay leaf, and puree the soup with an immersion blender to your desired consistancy.

Place soup back on stove and let it simmer for about 5 minutes and bring to a boil.

Add the macaroni, cabbage, and beans and let soup cook for 10 – 15  minutes. Season with more salt and pepper to taste.

Continue cooking until the cabbage is tender. (Remove from heat so the pasta doesn’t overcook). If you like a thick soup mash some of the beans and let the soup simmer on low for a few minutes. The soup will become thicker.

Serve soup with a drizzle of extra virgin olive oil and crushed pepper.

Great with Pão de Milho – Portuguese Corn Bread. Click here for the recipe. Enjoy!

Presunto & Arugula Flat Bread

I love the American “melting pot” of different cuisines from all over the world!

This recipe incorporates a little bit of Portugal and Tuscany with my variation on “Flat Bread”.

If you prefer you can leave out the Presunto for a vegetarian style flat bread. Enjoy!

Ingredients:

2 lbs Pizza Dough

3 tbsp olive oil

1 clove garlic

1 cup shredded mozzarella cheese

1 large chopped tomato

1/2 cup sliced Portuguese olives

1/2 cup thinly sliced red onion

1 tbsp Corn Meal

1/2 cup Blue Cheese or (any you prefer)

4 thin slices of Presunto chopped into 2 inches pieces

 2 cups of fresh Arugula or (fresh baby spinach)

Fresh black pepper


Instructions:

Roll out pizza dough into desired length on a large cookie sheet or 2 small flat pans that have been heavily sprinkled with cornmeal. (If you love a crispy thin crust roll out the dough very thin.)

Place garlic with the olive oil in microwave and heat for 45 seconds. Brush the garlic infused olive oil over the pizza dough.

Spread the shredded cheese, tomatoes, olives, onion and Presunto on top.

Bake at 400 for 10-15 minutes until cheese is melted and a crispy crust has formed. * Your oven may require more cooking time. Lift bottom of pizza and look for a lightly golden crust. The Flat bread will be crispy when done.

Let flat bread cool for a few minutes. Spread the Arugula over the pizza then add the Blue cheese. Drizzle the arugula with olive oil if desired and top with fresh cracked pepper!

Slice into squares with a pizza cutter or a large serrated knife.

This is delicious with a cool refreshing classic Portuguese style wine cooler!

Recipe: Poor ice into a tall glass – Add equal parts – Vinho Tinto (Red wine) and Ginger Ale (or Orange Soda).

Garnish with Orange Slice!

Cheers!


Papo Seco – Portugal’s Favorite Bread

The Portuguese passion for it’s cuisine is surely matched by the love of it’s bread! 

Home style bread & Portuguese rolls

Various regions of the country have their own artisan favorites such as Pão de Centeio “Rye Bread” and “Broa de Milho” from Tras-Os-Montes, and Pão Alentejano from Alentejo, but the Papo Seco which literally means “dry throat” is the most popular bread eaten all over the country both in homes and a staple at every restaurant. The roll is crusty on the outside and light and airy in the center which make it perfect for sandwiches and for absorbing sauces.

The method of preparing it and shape of the roll is uniquely Portuguese and extremely popular but I found there are many recipes. While researching some bread recipes I discovered that there are many different recipes to make Papo Secos. Some use basic dry yeast, while other use (fresh starter).

Making and storing fresh starter in your home seems quite easy and the benefits of using are quite fascinating. I had always wondered how the starter was formed without yeast, and I’m so happy that I found the recipe.

I was even more thrilled to discover that “King Arthur Flour” website actually sells the “Starter Dough” and you can buy it online. You can have a piece of the starter that began 300 years ago!They also sell the yeast that they use in their kitchens. The best part is that the yeast is 75% cheaper and better than the one in the supermarkets!

Please bare with me until the end of this post for recipe for Papo Secos. I found this information very interesting to share with you since it will enhance your future bread making!


“Where else can you find FRESH sourdough starter – not dried? And what a history this has; it’s descended from a starter that’s been lovingly nurtured here in New England since the 1700s. When you feed it, it quickly becomes your own, adapting itself to your own region and climate. Generations of bakers before you have made wonderful bread with a bit of this same bubbling brew. Join the ranks of satisfied sourdough bakers. www.kingarthurflour.com/shop

SAF instant is the yeast used most often in the King Arthur test kitchens. It’s easy to use (no proofing or pre-dissolving), fast-acting and long-lasting, continuing to work for hours longer than “rapid” yeast. It’s absolutely reliable. AND it costs 75% LESS than supermarket active dry yeast. ‘Nuff said. . www.kingarthurflour.com


Here is a recipe to make a “Starter Dough”from scratch!

APPLE STARTER:

3/4 CUP OF SPRING WATER, 2 CUPS FLOUR, 1/2 CUP GRATED APPLE.   Mix and cover, and let sit to ferment.
DAY 1-3:  Stir once a day.  You should be able to smell the starter.
DAY 4:   Put starter into a bowl and add 2 cups flour and 3/4 cup spring water.  Cover and let sit for another 24 hours.
DAY 5:   The starter is now ready to use, and can be refrigerated.   Once a week discard half the starter and add 1 cup fresh flour and 3/4 cup spring water, mix again


EASY YEAST STARTER or SPONGE:

1 PACKAGE DRY YEAST (2-1/4 TSP).  1 CUP WARM WATER, 1 CUP HIGH GLUTEN FLOUR.

Mix, set aside at room temperature for a minimum of 6 hours.  or, mix at night, put in the frig, and then take it out about two hours before making the rolls.


5 Healthy Reasons to make your own Sourdough Starter

1- Increases beneficial lactic acid

The longer rise time needed for sourdough increases the lactic acid and creates an ideal pH for the enzyme phytase. This enzyme breaks down phytates (read more about the dangers of phytic acid here) more effectively than in yeast breads.

Sourdough rye has the least amount of phytates (somehow the Swiss culture mentioned above must have known this) making it a healthier bread.

2- Predigestion of starches

The bacteria and yeast in the sourdough culture work to predigest the starches in the grains, thus making it more easily digestible to the consumer.

3- Breakdown of gluten

Here again, the longer soaking and rising times in the preparation of sourdough breaks the protein gluten into amino acids, making it more digestible.

4- Preservative

The acetic acid which is produced along with lactic acid, helps preserve the bread by inhibiting the growth of mold.

5- Better blood glucose regulation

There has been some research suggesting that sourdough bread — sourdough white bread — showed positive physiological responses. The subjects’ blood glucose levels were lower after eating sourdough white bread compared to whole wheat, whole wheat with barley and plain white bread. Interestingly, the subjects tested after eating whole wheat bread fared the worse — with spiking blood glucose levels.(http://realfoodforager.com/5-reasons-to-make-sourdough-your-only-bread/January 17, 2012)


 ♥♥♥♥♥♥♥♥♥♥♥♥♥♥♥♥♥♥♥♥♥♥♥♥♥♥♥♥♥♥♥♥♥♥♥♥♥♥♥♥♥♥♥♥♥♥♥♥♥♥♥♥♥♥♥♥♥

Since we know the benefits of making your own starter dough, here’s the Papo Seco recipe! Enjoy!


Papo Seco recipe – By: Azorean Green Bean

“Azorean Green Bean is all about preserving the food and culture of the Azores.

There’s a lot of overlap between the Azores and continental Portugal, and we’ll be taking a look at that, too. But for now it’s all about the Azores”


Ingredients:
4 cups of all purpose flour
1 tablespoon of salt
2 teaspoons of sugar
1 envelope package of rapid rise yeast
2 cups of lukewarm water
1 egg white beaten or milk for brushingDirections:

Using a large bowl mix together the flour, salt and sugar then leave aside.
In a separate large mixing bowl, add the two cups of lukewarm water and gently mix in the yeast using a whisk. Add the dry ingredients into the water a little at a time and keep mixing until it forms a soft ball of dough. At this time you will need to use your hands to mix in the remaining flour and combine together. Take the dough out into a floured surface and knead for a couple of minutes. Place the dough into a greased bowl and cover with a dish towel or blanket. Place the bowl in a warm place and let the dough rise for an hour.

Remove the dough and place onto a floured surface, punch the dough down, and knead for about 10 minutes, until the dough feels smooth.

Separate the dough into ten equal balls. Shape them and place them on a greased or parchment paper lined baking trays, and let them rise for 30 minutes. You can shape the rolls by making an indent in the middle with the side of your hand, or you can roll the dough into an oval shape and score with a knife across the top lengthwise before it goes in the oven. What ever way you chose you really can’t go wrong.

Preheat the oven at 375 degrees and brush the rolls with either egg white or milk. Bake for 30 minutes or until the rolls are slightly golden brown and sound hollow when tapped on the bottom.


♥♥♥♥♥♥♥♥♥♥♥♥♥♥♥♥♥♥♥♥♥♥♥♥♥♥♥♥♥♥♥♥♥♥♥♥♥♥♥♥♥♥♥♥♥♥♥♥♥♥♥♥♥♥♥♥♥
Here’s another recipe variation:
Visit portuguesebreads.blogspot.com for some great Portuguese bread recipes!


Ingredients

4 cups bread flour
1 cup fermente (starter)
3/4 -1 teaspoon sea salt
1- 2 cups tepid water

Technique

Mix the ingredients and knead until smooth. About 10 minutes of hand-kneading.
Cover and let rise overnight. 10-12 hours is normal. I always make the dough at night and by morning it is ready to finish and bake.

STEP 1 – Divide into balls – divide the dough into several balls – a little smaller than the size of a tennis bal
l

Dough divided into balls

STEP 2 – Roll on a lightly floured board until you have a smooth ball of dough

Roll into small balls

STEP 3 – Crease the ball of cough with the side of your hand – press firmly almost to the board.

Use the side edge of hand to crease

This is what is looks like with the crease:

Roll creased ready to pinch ends

STEP 4 – Twist the ends – now you must grab about an inch in from each end and twist the dough to for the ends – this technique hold the shape of the roll.
NOTE – some people use a little rice flour in the crease to keep it from sealing up.

Papo-Seco pinched ends ready to rise

STEP 5 – Lay the roll CREASE side DOWN onto a floured tea towel or clean cloth – push the towel up slightly to the roll as you form the next roll – this keeps the rolls from spreading out.

Crease side down on this step!

STEP 6 – cover and let rise – 1 hour – when ready. carefully lift the rolls onto your baking sheet, this time with the CREASE side UP

Ready to bake

STEP 7 – Pre-heat the oven to 425F and set a pan of water on the bottom rack. Bake the rolls for 25 minutes or until done – they should be golden brown when they are done!

Can you smell them?